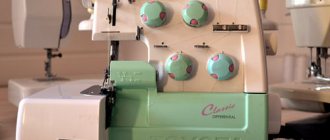
The tension of the lower thread, the quality and thickness of this thread, the correctness of threading the bobbin into the bobbin case, all this affects the quality of the stitch of the sewing machine. In this article, you will learn important nuances of the correct operation of the most important component of a sewing machine - the bobbin case and bobbin.
Video on how to wind thread onto a bobbin using a sewing machine winder.
Which bobbin should you choose for your sewing machine?
As the stitch is being formed, the upper thread pulls the bobbin thread out of the bobbin case. Both threads are intertwined inside the pieces being sewn, and a stitch is formed, from which a stitch is formed. An important factor influencing the uniform and smooth pulling of the lower thread is its weight and the material from which the bobbin is cast. By the way, do not confuse the bobbin with the bobbin case, the bobbins are shown in this photo, and the bobbin case is the device where the bobbin is inserted. Naturally, a plastic bobbin will slide much easier inside the bobbin case, ensuring uniform and smooth pulling of the thread, and its weight will be noticeably lower compared to a metal one.
Also, not all bobbins are interchangeable. This photo shows three types of bobbins. The one on the far left is for most household sewing machines. The bobbin in the center is used in an old-style household Japanese sewing machine called Brother. The rightmost bobbin is for industrial sewing machines such as the 1022 class sewing machine. When purchasing a new bobbin, always take a sample with you.
How to properly thread a standard sewing machine
It is not difficult to figure out how to insert thread into a sewing machine if the work is carried out on a modern electrical or electromechanical device.
Example of threading on the Minerva model
The most popular company currently is Minerva. There are many models that differ in complexity of arrangement, functional aspects, and number of operations. But there is one thing in common between them - the principle of threading.
Note! Another popular company is Veritas. The principle of threading is completely identical to Minerva.
The advantage of modern sewing devices is the presence of an electrical principle of operation, so the procedure for winding the bobbin and further actions. The standard filling pattern can be used in other similar models of modern production.
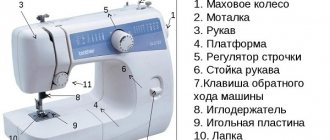
Installing the bobbin
The most important step is loading the bobbin. The principle of winding the thread and fixing the element (using the example of Minerva) is done as follows:
The structure of the mechanism for fixing the bobbin
- You need to remove the removable work table. To do this, the plastic plate must be moved to the left and completely removed. On a certain model, the principle of removing the table may vary.
- The housing has a plastic door. Open the compartment. Behind it you can see the bobbin mechanism, which needs to be removed. Pre-raise the needle using the handwheel. To do this, just pull the “setting pin” towards you.
- Remove the bobbin itself from the mechanism. Install the tool onto the top pin. Pull the “yarn” from the spool to the bobbin, using special winders to hold it. Thread the thread through the hole in the bobbin to secure it completely.
- Press the pedal, having previously set the “Idling” mode. The bobbin will automatically wind the thread. You can use a flywheel, but this winding principle will take a long time, since it is done manually.
You might be interested in: Methods for sewing knitted fabric using a regular sewing machine
Fixing and filling the bobbin
You need to correctly install the bobbin into the mechanism and the machine itself. Insert the device into the mechanism so that the thread is positioned clockwise relative to the slot. Then the bobbin element is placed in place, while you need to hold the “working finger”. On most machines, the principle of installing the bobbin is in accordance with such a mechanism.
Upper threading
The sewing mechanism of any model of device is designed in such a way that 2 threads are involved in the work - upper and lower. The easiest way is to place the top one. Arrangement algorithm:
- Fix the coil on a special pin.
- Pull the thread, using the tips, pull the thread through the fasteners on the body of the device.
- It is imperative to thread the thread through the fasteners, which are responsible for the tension force of the thread and the hole, which is responsible for the compensation spring.
- Near the foot, insert the yarn into the thread guide.
- Next, pass it through the guide hook and only then thread it into the eye of the needle.
The principle of threading the upper thread
At this stage, the arrangement of the upper mechanism is completed. You can insert the yarn into the needle manually, aiming at the eye, or use an automatic needle threader - a special mechanism for inserting material for sewing into the eye of the needle. Located on the left side of the presser foot and adjustable using a lever.
Threading the bobbin thread
After installing the bobbin mechanism, the yarn is put into operation. The main thing is to insert the bobbin correctly and position the sewing mechanism in it. Next, the thread is pulled up under the foot.
Threading the bobbin thread
Turn off the device and use the side wheel to lower the needle. In this case, you should hold the tip of the thread threaded into the eye of the needle. Making one scroll, the top yarn catches the bottom one. By pulling the top tip, you can pull out the material that comes out of the bobbin.
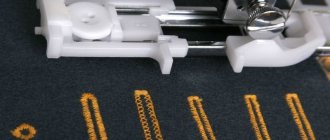
Checking the correct threading
The correct yarn threading option is checked in several stages. First, the location of the threads. The lower one should lie under the shoulder blade, and the upper one should be located between the teeth of the shoulder blade.
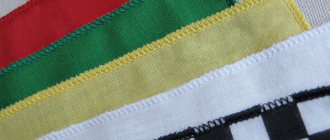
We also check the quality of the stitching. You need to take a small piece of fabric. Sew textiles using several types of stitches. If the thread breaks or is difficult to pass, then you need to adjust the fastening responsible for the tension of the material.
Checking the thread quality
The check is quite simple; the procedure will not take much time and will provide complete information about the settings of the device.
You may be interested in: Sewing procedure and simple patterns for women's panties
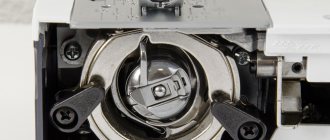
The bobbin is inserted into the bobbin case
The bobbin case is the most important part of the sewing machine, which should always be in perfect condition. The surface of the bobbin case should be mirror-like, at least clean, without rusty or oxidized areas. The slightest notch on the surface of the bobbin case or a chip in the wall will lead to the appearance of many stitch defects, ranging from looping stitches and skipped stitches to thread breakage.
Please note that bobbin cases do not always have a “tail”. In addition, when purchasing a new cap, keep in mind that this tail may be turned in the other direction.
Adjusting the bobbin thread tension
Regardless of the type of sewing hook, each one has an adjustment screw. The best way to unscrew it is with a small flat screwdriver, which is included in the tool kit of any sewing machine.
It is necessary to adjust the tension of the lower thread as little as possible, since the slots of the screwdriver can “break” the screw slot and nicks will appear, which will cause thread breakage and other defects. You should also not unscrew this screw more than half a turn, since the screw may pop out and get lost.
You can check the correct tension of the lower thread as follows. Insert the bobbin into the bobbin case, pull the thread from the case and pull it as shown in the photo. When twitching, the thread should come out jerkily under the spring of the bobbin case.
How to thread a Chaika sewing machine: video
This video describes in detail the process of how to thread a Chaika sewing machine with your own hands.
To ensure high quality sewing, as well as to avoid troubles during the work process, it is recommended that you carefully study the step-by-step instructions for threading a sewing machine of any type.
Source: helperlife.ru
The old mechanical sewing machine broke down, and I wanted to replace it with a new, electric one from China. And without knowing it, I took “the one from the TV store on the sofa” for review. Read the review to see what came of it.
At first I wanted to take the most sophisticated one with 7 types of stitches, but the manager replied that it was not available and offered the simplest one. Following the proverb “from a thin sheep at least a tuft of wool” - he agreed. I bragged to my brother about my upcoming purchase, and then for the first time I heard about an advertisement for a car from the Telemagazine. This sounded quite alarming to me. Sent quite quickly. After 20 days I received the parcel by Dutch post. The box is quite ordinary. A little wrinkled on the way. Dimensions 23x21x13.5 cm. The kit includes: a spare needle, a needle threader, two empty bobbins and two with threads - black and white. The machine also comes with extensive instructions in English.
It is possible to control it using a foot pedal. The pedal itself is quite small, length 88 mm, width 57 mm. The cable length is 150 cm, the plug is very similar to an ordinary 3.5 mm minijack. Powered by either four AA batteries or mains power. Power adapter with European plug. Cable length 110 cm. Declared characteristics. Both adapters are connected to the corresponding ports on the rear of the machine. The photo above immediately shows my first disappointment. We take the cars out of the box and it’s immediately clear that they are cheap. Flimsy plastic. Gaps between parts, etc. The length of the machine is approximately 19 cm, the height is also 19 cm. It weighs only 640 g without batteries. The width is 97 mm.
At the bottom there is a compartment for batteries.
Now let's get acquainted with the controls of the machine. Power button. To the left of it is the operating speed switch, Low-High, respectively. The flywheel is located on top of the rear part. In the middle there is a peg for winding thread onto a bobbin. The pin is put on the pin, and the reel is put on this retractable rod. Then, having thrown the thread through your finger or pencil, you need to run the machine idle and you can wind the thread. There is a bobbin holder on the front. From it the thread goes to the upper thread tension regulator. On the back of the machine there is a lever for the presser foot lifting mechanism. Made of plastic and quite thin, there are serious doubts about its reliability. At the top of the front of the machine there is a small light bulb. And also a small blade for cutting thread. The hole in the needle plate is small, oval in shape. The bottom bobbin is hidden under the semi-transparent cover. It is held in the recess by a weak magnet. I was unable to disassemble the machine, since the screws are located at the bottom of deep “wells” and I needed a long screwdriver. After receiving and inspecting the machine, I decided to read the instructions, but I didn’t want to translate it from English. I started searching for information on the Internet. I couldn't find any instructions in Russian. But I discovered that this machine is sold under many different names - Tailor, Sinbo, Irit, Fanghua FHSM-203, etc. almost all reviews from users were negative. Then I went to Youtube in search of instructions. The program “Smashing a sewing machine from a TV store - Advice from Everything will be good - Issue 407” left no stone unturned in hopes for high-quality sewing. And the last nail in the coffin is the video “ROSTOV. The whole truth about Mini Sewing Machines” from a repairman for these products. The information that everything inside is plastic and cannot be repaired was frankly not encouraging. But still, the opinion of strangers is one thing, and your own is another. Let's check the machine in action. I don’t see the point of inserting batteries inside, so I connected it to the network. Used to control the pedal. It’s quite normal, but it’s too small – I literally had to press with my big toe. The backlight is not very good. Let's start with a simple thin fabric. I found an old sleeve from a cotton shirt. Seems not bad. Only the seam pulls the fabric, you need to adjust the thread tension. Front side. Reverse Stitched normally. I tried stitching the cuff. The machine stopped and the thread flew out of the needle. Now a piece of knitted T-shirt. Look at the lighting at the same time. On the front side there is just a loose seam. Please note that the fabric does not stretch. But the reverse is a complete failure. It is necessary to adjust the tension of the lower thread, but the device does not have such an option. Absent. And finally - a control shot. Two layers of thick denim. The front seam is small and looks good. But on the reverse side the thread is simply straight, it cannot even be called a seam. Thus, the machine can sew, but it needs adjustment, and this is not possible. Thin fabric pulls. When sewing on thick fabric, there are problems with the bottom thread, and sometimes the machine just stops and cannot sew. As they called it in the program - a machine for handkerchiefs. It could be recommended for very undemanding users, if not for the price. For this money, the machine will not be suitable either for handkerchiefs or for pampering a child. Once again, goods from TV stores have shown their unsuitability for use. Avoid them. That's all. Thank you for your attention. Update.
It turned out that my top pin and thread were installed the other way around. I turned it over and tried to adjust the thread tension. It only got worse. Now the thread keeps flying out of the needle. The machine doesn't sew.
The product was provided for writing a review by the store. The review was published in accordance with clause 18 of the Site Rules.
Source: mysku.ru
How to improve bobbin glide inside the case
If you have an old sewing machine or your sewing machine has been sitting in the closet unused for years, the inside (bottom and walls) of the bobbin case will become rusty or oxidized. As a result, the machine will constantly tear the thread, sew with gaps, etc. To correct this defect, you can cut out a spacer from a plastic office folder and place it on the bottom of the bobbin case.
Trace the outline of the bobbin with a simple pencil and cut out the outer outline of the gasket with scissors.
The inner hole of the gasket is cut out with miniature manicure scissors.
By the way, instead of plastic, you can cut the gasket out of tissue paper, tracing paper, etc. To improve the sliding of the bobbin, it is recommended to oil the paper gasket.
The gasket should fit freely, without effort, onto the bottom of the bobbin case.