Popular wisdom says that if something needs to be done well, then you have to do it yourself. Many people do not like the work of some famous pop singers, rock singers, etc.
But instead of criticizing their wheezing, squeals and wild dancing on stage, for example, F. Kirkorov or V. Serduchka, and also not bothering your ears with the cacophonous voice of professionals, it is better to sing into the microphone yourself and at the same time enjoy the charming voice from the speakers of a smart TV or home theater speakers connected to it.
To implement the idea, you only need to correctly connect the microphone. This will be discussed in the material below.
How to realize your plans?
To make this happen, very few steps are required:
- Install a karaoke application on Smart TV;
- Connect a microphone;
- In the installed application, launch your favorite song;
- To please loved ones, friends and most importantly yourself with the vocal abilities that Mother Nature has endowed the singer with.
Installing the application
Smart TV software stores have a large selection of karaoke utilities. A well-known and well-proven program is “Karaoke Master”.
Also, a significant selection of songs is stored on the karaoke.ru resource.
Usually, there are no problems at this stage of executing the plan, since the choice of applications for a smart TV is extensive, each user can easily choose the appropriate option.
Difficulties appear during the second step, i.e. when connecting a microphone. Therefore, close attention is paid to this problem below.
Connecting a microphone
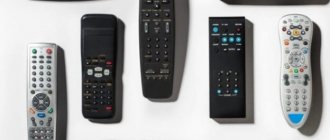
An important link in the “singer-TV” chain is the microphone, so the choice should be taken with care. The performance of the entire system depends on this.
To make a successful connection, you must consider the following:
- Be sure to purchase a suitable microphone model for the TV you have at home. If a person decides to ignore this point, then with a high probability the equipment will not work the way the user wants it. Before purchasing, you must provide the seller with accurate information about the brand, model and series number of the TV to which you plan to connect the microphone;
- If you choose the right microphone model, it will not be difficult to connect it to the TV and, after testing its performance, make sure that the task was completed successfully. In Smart TV, after connecting the microphone, the device is automatically recognized and correct functioning is configured;
- Once connected, the correctly selected microphone will immediately function normally and no special configuration of the equipment will be required. All you have to do is open the karaoke application on Smart TV and delight others with your divine-sounding voice.
Connection via smartphone
Owners of gadgets with Android and iOS operating systems need only to install karaoke on their TV:
- Download a special application. The top five includes Mobile Karaoke Quail, StarMaker, Smule, Karaoke in Russian and Karaoke Anywhere.
- Connect the device to the TV using a USB/HDMI cable. After connecting USB to the devices, turn on the TV, select the “Use as a memory storage device (as USB)” function on the phone screen. Press Source on the TV remote control or select USB as the source.
- Using special adapters or a USB adapter, connect a microphone to your smartphone.
- Check the functionality of the created system. Launch the program on your mobile device. And enjoy karaoke.
If the connection is correct, the device’s monitor will display a request for permission to connect the headset or an icon indicating the presence of an external device.
To check the functionality of the microphone, go to the Voice Recorder application and record your voice. If all sounds are clearly audible when listening to the recording, the headset is correctly connected to the device.
Connecting your phone to TV via Wi-Fi
Depending on the phone model, you can connect to TV using WI-FI. For this it is enough:
- Activate the Wi-Fi Direct program on your phone. As a rule, the functionality is located behind three dots in the right corner of the “Wireless Networks” section.
- Go to the TV menu, find the “Network” section and activate the “Wi-Fi Direct” function. Select the one you need from the list of devices provided.
- Confirm the request received by phone.
After integrating the devices, you need to enable the karaoke application on your phone. And enjoy your new home entertainment.
Karaoke on a flash drive for TV
One of the simplest options for installing karaoke on a TV is to use a flash drive with a pre-recorded program for this entertainment. Before downloading karaoke to a flash drive, you need to check the availability of software preinstalled by the manufacturer. Many brands install their own software on equipment that is compatible with the devices.
Connection methods
There are two ways to connect wirelessly, using a cable connection to the TV and a microphone.
Both methods are reliable, but have serious disadvantages and some advantages. For example, in the first case, users are often scared off by the price, and in the second, the cord is constantly dragging behind the performer, who, instead of delighting loved ones with his vocals, constantly trips over the cable.
Wired connection via USB
Refers to the simplest method of connecting a microphone to a TV. Most often, this method is preferred by owners of Samsung TVs that have USB ports installed on the rear panel.
Immediately after installing the USB plug into the appropriate port, the smart TV, having detected the device, displays a message on the screen indicating a successful connection, and the microphone immediately functions fully.
For the connection method in question, special adapters are sometimes used.
If the microphone is equipped with a different type of plug, you can connect the USB port of the TV using an adapter.
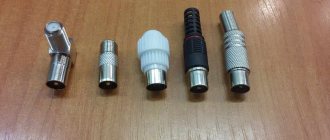
Wired connection via 3.5 and 6.3 mm connectors
Some TVs are equipped with standard Audio IN jacks.
After connecting the microphone plug to the socket, sometimes you need to press a specially provided key or the toggle switch to turn on the device.
In order to obtain high-quality sound, it is recommended to connect a microphone using an amplifier. Such equipment is equipped with a 3.5 jack or USB connector.
This option with a receiver is often used by LG TV owners, since a microphone cannot be connected directly to them via Mini Jack 3.5.
Of course, not every person has the free funds to purchase additional equipment in the form of an amplifier, however, you can assemble its circuit yourself. It will take a little time and effort with a soldering iron to assemble several of the elements shown in the figure below.
There are many similar circuits for amplifying the sound signal of a microphone on the World Wide Web, so a person with skillful hands can save considerable money in the family budget by assembling the amplifier with his own hands.
Wired connection with Tulip plugs
Until now, popular brands of TVs are equipped with sockets for connecting with a tulip.
If such connectors are not provided on the back panel of the TV, then special adapters “Tulips - Scart” are produced.
After connecting the microphone through the adapter, you should set the toggle switch on the adapter body to the desired operating mode.
Wireless connection
Nobody likes wires getting tangled under their feet, and there are a wide variety of wireless microphones on the market today. You just need to purchase a device that matches the technical characteristics of a specific TV model.
After prolonged use, all wired microphones experience loosening of contacts at the connection points, which leads to unexpected disconnections at the most inopportune moments. Wireless devices are completely free of this problem. Among their disadvantages, only high cost can be noted.
It is not recommended to purchase cheap fakes, since such a wireless device will not last long and will constantly fray the vocalist’s nerves with malfunctions.
The manufacturer of modern smart TVs provides for working with wireless microphones without the use of additional equipment. Therefore, when connecting them, there are almost never problems, which cannot be said about microphones connected via a cable connection.
How to choose a microphone
Technology definitely does not stand still. But the problem with even the most advanced Smart TVs is that in most cases you won’t be able to connect a microphone and immediately start singing.
Even with the appropriate connector, the display does not respond to the connection.
A solution can be found. The first step is to find out whether a microphone can be connected to a specific TV model. Some TVs do not provide this. But even in this situation there is a loophole. Even if you have to use auxiliary devices.
To get home karaoke on your smart TV, you will need to purchase a suitable microphone.
The microphones themselves are offered in several versions when it comes to connections:
- 3.5 mm wired connector;
- 6.3 mm wired connector;
- wired connection via USB port;
- wireless connection using Bluetooth technology.
If Smart TV does not provide 6.3 or 3.5 mm connectors on the back or side panel, then there is no point in spending money on such devices.
If you have a USB port, there is still no guarantee that you will be able to organize karaoke with a microphone connected via USB. Here you will need to additionally look into the technical documentation and study the characteristics.
A wireless microphone is rightly considered the most practical and convenient to use. It connects extremely simply, and is used regardless of wires.
Some Smart TVs initially have a karaoke function. In this case, just connect the microphone according to the instructions, select the appropriate mode from the menu that appears and start having fun.
Main connection difficulties and recommendations for eliminating them
Often, independent attempts by a user to connect his existing microphone to a TV can hardly be called successful, but when the device is selected correctly for the TV and all technical characteristics of the equipment fully comply, it is possible to quickly eliminate problems that have arisen.
Problems:
- After connection, the sound is not transmitted to the TV;
- The device refuses to be recognized on TV.
Recommendations:
- Update the karaoke application (in most cases, this simple step can eliminate the difficulties that have arisen);
- Connect via amplifier;
- Connect the cable from the microphone to the DVD player, which is connected to the TV (considering the fact that many users have a DVD player, this method is the most convenient for quickly solving connection problems);
- Check the position of the switches on the microphone body and, if necessary, set to the active position;
- Check the charge level of the wireless device batteries and, if necessary, replace them with new ones;
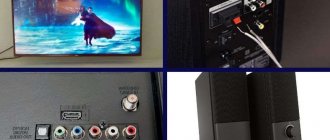
- In the case where there is a home theater at home, using the latter is most advisable. Most of these systems support working with microphones and the user will simply need to connect the plug from the microphone to the corresponding connectors of the receiver;
- A temporary solution to the problem is to use a laptop or desktop PC as an intermediate link, and an HDMI cable can be used to connect the equipment.
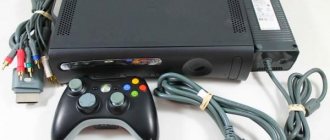
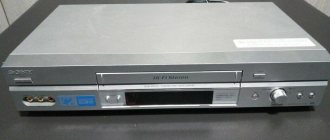
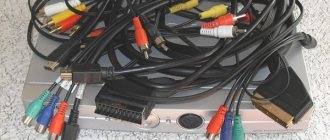
Connection via DVD
A DVD player with music discs is the main assistant in creating home karaoke. It only takes 4 steps to set it up:
TV repairs are 30% cheaper
than in service centers near your home
Order repairs
- Select cables with suitable types of ports (HDMI or SCART) and connect the set-top box to the TV.
- Connect the microphone to the player.
- Using the remote control, select the signal source - DVD.
- Turn on the installation and enjoy karaoke using a special disc.
A similar karaoke system on your TV can be connected using a Blu-Ray player.
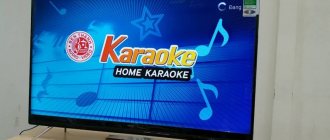
How to make karaoke at home
If anyone is unfamiliar with karaoke devices, we will try to cover this topic as fully as possible. The operating principle of the system is very simple:
- To make people sing, the TV starts playing music and showing words, displaying them on the LCD screen;
- It is necessary to connect speakers to amplify the sound;
- Before you start singing, a countdown appears on the screen, which is very useful if the composition is unfamiliar.
The most common option for setting up a karaoke system was connecting via DVD (BBK). Today, DVD players are also popular, but have already lost the palm to karaoke TVs with Smart TVs. These devices have almost all systems for sound reproduction, so in order to sing karaoke you only need to download the karaoke program for Smart TV.
Let's look at how a karaoke system on DVD works:
- You need to connect a DVD to the TV, which is the playback medium;
- Next, having installed a disk or flash drive with content, half the work is done;
- To see what we need to sing, we need a screen. In our case, let it be a Phillips LCD TV;
- A microphone will also be required. It is advisable to choose a radio-controlled model so as not to get tangled in wires during a particularly emotional performance;
- Speakers will also help, as they will significantly improve the sound quality.