Content:
- 1 Why use a VCR
- 2 Common methods of connecting equipment 2.1 Classic RCA connection
- 2.2 Connection via SCART
- 2.3 Application of coaxial cable
- 2.4 How not to knock down the antenna when connecting a VCR
A VCR is a rarity of modern technology that can be used to play cassettes containing films, TV series, and family celebrations. Often it is for the sake of the latter that they take out the radio from the closet and connect it to a regular or modern TV. Let's figure out which TVs are easy to connect vintage equipment to. What to do with modern TVs from LG, Philips, Samsung, where there are no special connectors. And how to generally connect a VCR to a TV.
Methods for connecting a VCR to a TV
If you follow the instructions, you can easily connect video equipment to any TV device. When it comes to connecting equipment of different generations, certain questions may arise. The installed plugs and connectors often differ, and therefore there are different connection options.
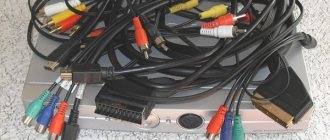
There are several types of cables for connecting a VCR to a TV:
- Using coaxial cable.
- Via RCA cord.
- Using a SCART cable.
Coaxial wire
This is one of the most common ways to connect a VCR to a TV. To connect the device to the TV via the selected wire, you need to perform a number of simple steps.
It is important to be very careful, because if one plug is connected incorrectly, the system will not start.
Instructions:
- To connect the cable to a tape recorder, use the RF/Coax Out output, and on TV - RF/Coax/Ant In.
- The tape recorder is plugged into the socket, and the signal source is selected on the TV through which the image and sound from the tape recorder will pass.
If everything is done correctly, a picture will appear on the TV monitor.
RCA connector
Another effective option is using an RCA cable. To properly connect the tape recorder to the TV in this way, each of the devices must be turned off from the network. This precaution is necessary to ensure that the contacts are not damaged.
Procedure:
- Connect the yellow plug to the tape recorder via the Video Out connector. On the TV panel, connect the cable through the Video In jack. On some devices this is printed as Video-1. To make it easier for users to understand the connection diagram, manufacturers paint the wires in different colors. For installation you just need to connect the wires to ports of the same color. But it is advisable to focus not on them, but on the inscriptions that are placed above the nests. This way you can definitely avoid mistakes.
- In the same way, connect the other ends of the cable - white and red - on the Video Out video device, on the Video In TV.
- The tape recorder is connected to the electrical network, just like the TV. After that, on the two devices press the Start or Start button.
- On TV, in the signal sources section, a new operating mode is set. This is usually Video-1 or Input-1.
If the operation is performed correctly, the recording on the video device will start and the picture will be transferred to the TV.
Connecting the SCART connector
To achieve higher quality signal transmission, you need to use a SCART connector. If such a port is not available on your video equipment, you will need a SCART RCA adapter.
In this option, the cable is connected to the TV, and a SCART adapter is placed on the existing connector of the video camera, and the wire is connected to it.
To transmit the signal, use the S-video connector on the radio. Two tulip plugs are used.
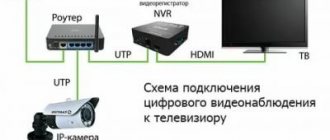
Connection in parallel with cable TV
To connect a VCR to a TV if you have a cable TV set-top box, the operation algorithm will not change at all - you need to repeat all the manipulations, as in the case of the RCA wire.
But first you will have to connect to the equipment that transmits cable broadcasts.
And there is an algorithm for this:
- The coaxial type is mounted to the cable television receiver via the TV Out wire and the RF In connector of the video camera. You need to understand that such a connection will not be able to transmit an HD signal and the picture quality will not be high.
- Next, you need to connect the RCA wire correctly. Connect the yellow plug to the Video Out connector of the receiver. On the VCR, the jack is labeled Video In.
- Mount the red and white plug to the Audio Out and Audio In ports, respectively.
- The next step is to connect the AV wire. Connect the yellow plug to the VCR via the Video Out channel, to the TV – Video In or Video 1. Connect the red and white tip to the Audio Out and Audio in outputs, respectively.
- As soon as the work with the cords is completed, connect the devices to the electrical network and turn on the equipment. On the TV you need to select the signal source Video 1 or Input 1. On the tape recorder - Cable.
If the image does not start appearing on the TV screen, you should check that each wire is installed correctly. The guide will help you solve the problem of how to connect the VCR to the TV.
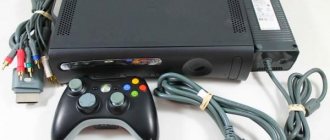
Why use a VCR
The appearance of the first videotapes created a real sensation in the world of cinema. Foreign cinema and recordings of classic and already legendary films have become available for viewing. Users also learned how to record their favorite TV shows onto cassettes.
Video cameras were also cassette cameras. They filmed all significant events: birthdays, anniversaries, awards, weddings, graduations. Moreover, the quality of the recording was at a good level at that time. As a result, many people have 1-2 video cassettes with very valuable recordings in their closets. And what to do with them:
- You can digitize the recording and convert it to DVD format. Finding salons that still do this is quite difficult, but it is possible. In this case, the maximum quality according to the new standards will be 720x576px.
- Get out a working VCR and just enjoy watching a movie.
For the second option, you will need to understand how to connect the VCR to the TV.
Connection options
The instructions should tell you how to connect the VCR to your TV. Installing the equipment takes a minimum of time. It is necessary to connect the connectors with a special cable. However, users have many questions. Not everyone understands the names of interfaces and their purpose.
There are several ways to connect a VCR to a TV:
- coaxial cable;
- RCA cord;
- SCART wire.
Each of these options has its own advantages and disadvantages. The final choice must be made in accordance with the interfaces that your TV is equipped with. For example, some modern models have an RCA connector, while others have a SCART connector.
It is possible that you will not find the necessary interfaces. This applies to new products on the TV equipment market. In this case, you will need to purchase an adapter.
Now let's take a closer look at each of the options presented above. We will create step-by-step instructions for setting up a correct connection.
Common methods of connecting equipment
Detailed instructions on how to connect a video recorder to a TV can be found in the operating instructions for the equipment. But since the technology is quite old, many users may lose this document.
The connection is made sequentially, as in any technology, but there are no modern options such as USB, HDMI. Only the following connectors are presented:
- For coaxial cable;
- RCA connector;
- Input for SCART wire.
We will analyze in detail each option for connecting equipment. And we’ll look at options for what to do with connecting a VCR to a modern connection.
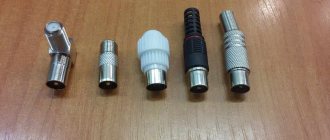
Classic RCA connection
RCA cable or tulips are a classic option for connecting vintage equipment. In modern equipment, such connectors are also available, but are rarely used. New “flat” TVs often do not have inputs for tulips. Therefore, you will have to choose a different connection method or buy an adapter.
You can connect the video recorder to the TV via tulips (RCA) like this:
- The yellow connector is inserted at one end into the Video OUT port on the VCR itself, and at the other end into Video 1 or 2 on the TV panel. Typically the connectors are the same color as the plugs to make wiring easier.
- The white and red connectors need to be placed in the audio inputs - these are cables for audio signals.
- Connect the radio to the network and use the Play button. Turn on TV.
- Find the broadcast source in the TV menu - AV and switch to it.
- If the connection is correct, the video menu will be displayed.
In some TV versions there may be not three inputs, but as many as 9. This is done for the layout of color channels. In this option, you need to focus on the colors of the tulip and the designations on the OUT-IN panel of the TV.
Tulips are the easiest way to connect a VCR to an old TV. But in terms of image quality, this option is the weakest. An RCA cable may reduce video and audio quality.
Connection via SCART
A more modern way to connect video equipment and TV. This is an alternative to RCA ports. Moreover, via SCART you can achieve video and audio transmission without loss of quality. But new TVs may not have such a port, then an adapter will be required.
There are no difficulties with this connection: one end of the wire is inserted into the corresponding sized connector on vintage equipment, the other - on the TV. Then both devices turn on. And the AV signal source is located in the TV menu.
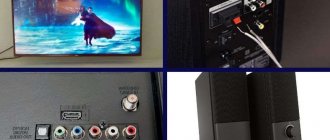
Application of coaxial cable
Coaxial or antenna cable fits most modern TVs. To connect the video recorder through it, just follow the simple instructions:
- Insert the cable into the video equipment connector marked RF/COAX Out.
- Connect the other end of the wire to the TV in the RF/COAX In connector.
- Turn on the equipment. On the VCR, press the Play key.
- Using the TV remote control, start searching for channels. When the video frequency is detected, save it under a specific channel number. Through it you can turn on the tape recorder again without a new connection.
- Watch the selected videotape.
The only difference from previous methods is that you need to find a channel that shows video from a tape recorder connected via an antenna wire. At the same time, other TV programs, if they are broadcast via a digital signal via an HDMI cable, will not be interrupted. But you will have to switch from HDMI to TV or another signal source where the VCR will be picked up.
You need to start searching for channels on your TV, not on your digital set-top box. If you have this additional equipment connected, remove the remote control from it during setup so as not to get confused in the settings.
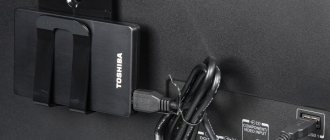
How not to knock down the antenna when connecting a VCR
Broadcasting digital television is also possible via coaxial cable in an apartment or private house. They come from a satellite dish or a common wire in the entrance of a high-rise building. And so that you don’t have to pull out the antenna and insert the cable from the VCR, you can do the following:
- Buy or install an attachment that will act as an adapter.
- Purchase two sets of RCA cables and one coaxial cable.
- Connect the Cable Out ports on the set-top box to the RF In on the video equipment using a coaxial cable.
- Connect one tulip to the ports on the set-top box Audio Out and Video Out and to the inputs on the video recorder Video In, Audio In.
- Include the second set of tulips in the VCR and TV (Video In or 1).
- Turn on the equipment and check its functionality.
Such a parallel connection will allow you to quickly switch between the video camera and the antenna signal, but will significantly reduce the quality of the broadcast. A modern solution is to connect digital television and additional equipment separately, using different wires.
DIY connection
Performing this operation will not be difficult. The yellow plug is connected to the video camera via the Video Out connector. On the TV, the cord is plugged into the Video In socket. On some receivers it is designated as Video-1. For quick and easy connection of equipment, the connected parts of the cable are painted in different colors.
For proper installation, you just need to connect the wires according to the color scheme, also focusing on the inscriptions. After making the cable connection, turn on the VCR and TV to the network, press the “Start” or “Start” button. A new operating mode (Video-1 or Input-1) is activated on the receiver. If all steps are completed correctly, the video starts to display an image with sound, broadcast on the TV screen.
Possible faults
Connecting a VCR to an LG, Samsung, or Philips TV directly or through adapters is quite simple. The main thing is not to get confused in the inputs and outputs. But after connecting the equipment, various technical problems may arise, which can be resolved quickly enough:
- No signal due to broken cable or connector. Before connecting equipment, carefully inspect the wires for broken braiding, bends or clamps. Check the condition of the connectors. You can clean them with a soft brush. If the problem persists, try another connection option.
- No required entry. Inspect the ports on the video and TV. If the latter does not have a single suitable option, you will have to buy an adapter. To purchase the desired option, you should write down the names of the ports from the video recorder and TV.
- The TV does not recognize signals. The reason may be a cable, connector or broken socket. The test takes place using a different connection method. If the problem persists, it is necessary to replace the connectors on the equipment or send it for repair.
- Overlaying sound from a TV channel with cues from films from videotapes. The reason is the overlap of the antenna signal with the audio. You can solve the situation by moving the antenna cable from side to side to shift its position. Then the lower frequencies from the VCR will not be interrupted by TV channels.
These are the most common faults. It's also worth considering that VCRs are old technology and may not work on their own. They encounter problems such as cassette jamming, failure to rewind, and many other defects. In such a situation, you need to take the video camera for repair or digitize the tapes into a new format onto DVD discs.
Found a mistake? Select it and press ctrl+enter
- 60
Problems and solution
Question to the expert
Lack of connection between the VCR and the TV (picture, sound). What to do?
Check the presence of a SCART connector and connection to the corresponding sockets.
There is interference when displaying pictures and sound
Check the reliability of the cable connection and the condition of the connectors
The TV receiver does not receive a signal from the VCR. What should I do?
The wrong codec is selected, the cable is damaged, there is no network connection.
There is an additional background on the sound. What is this?
It is necessary to adjust the external antenna, or configure the compatibility of the equipment according to the instructions.
“Signs of life” do not appear...
Check the network connection and compatibility of cable connectors.