Good day everyone!
Recently, wireless mice and keyboards have become quite popular.
On the one hand, this is very convenient: there are no extra wires on the table, the mouse slides freely in any direction, it is comfortable to use in “road” conditions; on the other hand: there are questions about the connection, plus they don’t always work until Windows boots (which is sometimes necessary).
I will build this article in the form of step-by-step instructions for connecting a standard wireless mouse (I will consider the two most common options: the so-called radio frequency mouse, and Bluetooth). I think the note will be useful to all novice users who have not yet used this type of mouse.
Now closer to the point.
Connecting a wireless mouse
RF (with adapter)
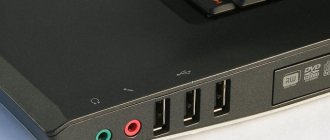
This mouse comes with a small adapter (looks like a flash drive). As a rule, the size of this adapter is very modest: after installing it in a USB port, the protruding part is barely noticeable (shown in the photographs below).
I would also note that, on average, mice in this category are cheaper than Bluetooth mice (today prices are comparable to classic wired ones).
I'll look at connecting it step by step.
STEP 1
And so, first check the contents: there should be the mouse itself, batteries and an adapter (see photo below). It is worth noting that batteries are not always included with the mouse (pay attention to this when purchasing!).
Note: 1) by the way, some novice users are faced with the fact that they cannot find the adapter. The fact is that sometimes it is located in the battery compartment (inside the mouse). Apparently, manufacturers do this so that it does not get lost.
2) Before you start connecting: disconnect your old mouse from the computer.
RF mouse contents
STEP 2
Turn the mouse over, open the battery compartment and install them (pay attention to the polarity).
STEP 3
Some mice are equipped with additional switch. Check that it is in the “ON” position (i.e. turned on). If you do not have such a switch, then the mouse, in principle, should start working immediately after installing the batteries.
Pay attention to the switch!
STEP 4
Connect the adapter to the USB port (after a few seconds you should hear a characteristic sound from Windows, which always happens when connecting USB devices).
Connecting the adapter to the USB port
STEP 5
Try moving the mouse, spinning the wheel, pressing the right/left buttons. As a rule, after 1-2 clicks the mouse should establish a connection and start working.
I note that some mice have a special feature. button for establishing a connection (sometimes it is combined with the “DPI” button. Located next to the wheel). If you have a similar button, click it.
In general, that's all. If everything is in order with the mouse, the batteries are new (and not yet empty) - then the mouse will start working. No extras. No settings are required.
STEP 6
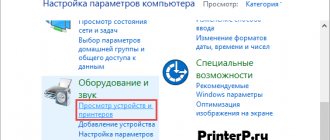
If the pointer movement speed is too fast (slow), then you can go to the control panel (to do this, press Win + R and enter the control command), go to the “Hardware and Sound” section and open the mouse settings (see screenshot below).
Control Panel - Mouse
Next, in the “Pointer Parameters” section, set the pointer speed. In general, everything is standard.
Pointer speed
Bluetooth mouse
Bluetooth mice are less popular than previous ones. To use them, of course, you must have a Bluetooth adapter installed on your computer/laptop (usually all modern devices are equipped with it). Before setting up and connecting, I recommend checking whether Bluetooth is working for you (and turning it on if necessary).
Now, actually, to the point.
STEP 1
Go to Device Manager and see that the Bluetooth adapter is working fine and there are drivers for it (how to open Device Manager).
The device works fine (Bluetooth adapter)
STEP 2
Check if Bluetooth is enabled in Windows settings (some laptops have a special button on the device body).
If you have Windows 10, go to the OS settings (Win+i button combination), to the “Devices/Bluetooth and other devices” section and check that Bluetooth is turned on. For an example, see the screenshot below.
Is Bluetooth turned on (Windows 10)
How to connect a wireless mouse to a laptop via Bluetooth without an adapter
How to connect DualShock 4 to Windows 10 PC - step by step instructions
The new generation of laptops is available with a minimum number of USB ports. This is because external devices can be connected to them via Bluetooth. The possibility of such a connection is explained by the presence of built-in Bluetooth in laptops.
Connecting a wireless mouse to a laptop via Bluetooth without an adapter
Important! True, you can use Bluetooth only if you have up-to-date drivers. This can be understood by the absence of a Bluetooth icon, an adapter in the device manager and the necessary settings.
If there are drivers and they are up to date, then to connect the mouse you need:
- Turn on the mouse, that is, press and hold the button (for example, “Connect”) until it flashes steadily.
- Right-click on the Bluetooth icon.
- From the list that appears, select the desired mouse and click on it.
Note! To configure additional mouse options, you should install its software from the manufacturer’s official website or from a disk.
Installation and configuration on Windows 7
How to set up a wireless mouse on a laptop and connect without a USB adapter in Windows 7?
Algorithm of actions:
- Activate the “Computer” icon.
- Click on the “Properties” button.
- Enter "Device Manager".
- Double-click to open the “Bluetooth Radio Modules” tab and make sure there are Bluetooth modules.
- By clicking on the name of the module, select the “Engage” item.
- Activate bluetooth using special laptop buttons or the “F1-F12” keys together with “Fn”. To configure the module, you need to click on it using the right key.
- Click on the “Network and Sharing Center...” item.
- Enter the “Change adapter settings” tab.
- Click on “Change adapter settings”.
- Double-click the left mouse button to move to the “No connection” position.
- Right-click on the Bluetooth icon, then left-click on “Properties”.
- Enter “Settings...”.
- In the line “Allow PC detection”, check the box, click “Apply” and “Ok”.
- Through the “Start” button, activate the “Control Panel”.
- Click on “Add device”.
- Select the desired mouse in the drop-down list and click “Next”.
This completes the installation process. You need to click “Close” and you can start working.
Installation and configuration on Windows 10
Connecting a mouse via Bluetooth to a laptop with Windows 10.
Connection process:
- Activate Bluetooth in Settings.
- Move the power button on the mouse to the “On” position.
- Click on the “Start” button.
- Select "Options".
- Click on the “Devices” tab.
- Select the desired mouse from the drop-down list, select it, and click the “Connect” tab.
Next, you should act in accordance with the prompts of the launched wizard.
Note! Sometimes, when connecting a mouse, you are prompted to use a passkey. You should select the “No key” option. This mouse will not work on Windows 10 with an access key.
After all the above steps, the mouse is ready for use. You need to click on the “Finish” button and you can start working.
Is it possible to use a Wireless mouse without a standard adapter?
RF (Wireless) mouse only works with a standard adapter. It can work without an adapter, as long as it combines Wireless + Bluetooth functions.
How to connect an RF mouse
The first thing you need to do before connecting the mouse is to check its compatibility with the computer to which it will be connected.
There are 2 types of radio mice:
- connected to a 27 MHz USB receiver supplied with the mouse;
- connected to the 2.4 GHz USB Bluetooth receiver that came with the mouse, or to the Bluetooth module inside the laptop.
You can check the website or read the mouse packaging to make sure it is compatible with the operating system you will be connecting to.
Reference! Depending on the model of the radio frequency mouse, the connection may differ slightly, but its basic principles are almost the same for all radio mice.
Step 1. To make the connection, insert the receiving device (USB receiver), usually supplied with a wireless mouse, into the USB connector of the PC. Windows will automatically search for and install the required driver.
Step 2. Install batteries of the desired type into the wireless mouse, observing the polarity. On most models, you can lift the top panel of the mouse or open the lid on the bottom to reveal the battery compartment.
Important! Wireless mice typically use AA batteries to power them. If batteries are not included with the mouse, you will need to install new batteries that you purchased. If batteries are installed in the battery, they may need to be charged.
Step 3. Turn on the mouse. This usually requires pressing a button or moving a switch on the underside of the mouse. In the photo, the button is located on the top side of the platform.
Reference! If you find the power button or can't find it, you can refer to the manual that came with your mouse for any information you need.
Step 4. If possible, select the required channel with the button. Channel selection is required to connect the mouse to multiple PCs in a room.
Step 5. Connect the mouse to the receiving device. To do this, press and hold the device pairing button on the mouse. If necessary, also simultaneously press and hold the button on the USB receiver. Continue holding the buttons until the light on the underside of the mouse lights up or the indicator on the top of the mouse changes its glow.
Reference! Typically, after pairing, the mouse light will go from flashing to a steady light. Some wireless mice are plug-and-play and do not require these button pressing steps.
Step 6. Turn the mouse over, place it on a flat surface and start moving it, checking that it is connected correctly and the cursor is moving correctly. If the cursor moves normally, the device is connected.
Important! You should not use an optical mouse in rough, wet, dusty areas as this may reduce its tracking accuracy.
Connect a wireless radio mouse via a USB adapter
If your mouse comes with a USB receiver, and this is the only connection interface (or Bluetooth is not available/not working on your computer), then you need to connect this receiver to the USB port of your laptop or desktop computer.
After connecting, Windows should install the drivers. I have already connected many wireless mice, and I have never encountered a problem when Windows cannot find or install the required driver. If it happens that the system does not recognize the device, then you can try downloading the driver or software from the manufacturer’s website. We write in the search the name and model of our mouse. For example, “Logitech M185” and in the search results we go to the official Logitech website. There we already look for the downloads section and download the necessary driver. But you probably won't have to do this.
We insert a battery into the mouse, or charge it and turn it on. The indicator may then light up (but it may not).
After this, the mouse should work immediately. If it turns out that after connecting the wireless mouse does not work, then first of all:
In most cases, these devices connect and work without any problems at all. Especially in Windows 10, Windows 8, Windows 7.
How to Connect a Bluetooth Mouse on Mac OS X
Step 1: Open the Apple menu by selecting “System Preferences”.
Step 2. Click on the “Bluetooth” icon.
Step 3. In the menu that opens, click “Turn Bluetooth On”.
Step 4. Switch the gadget's power to the active state. If the connected device has a pairing button, activate it to put the device into this mode. Wait until the detected mouse appears on the right side of the window.
The mouse is ready to use.
Rules for connecting a wireless mouse to a laptop
When the mouse is not in use, to conserve battery power, it is recommended that you turn it off using the power off button on the mouse unless it has an automatic shutdown feature.
You can also set the mouse to turn off using Windows controls.
Step 1. Click “Start” and select “Control Panel” in the “Windows System” directory.
Step 2. Click on the “Mouse” icon.
Step 3. Select the “Hardware” tab and click “Properties”.
Step 4: In Mouse Properties, go to Power Management and select Allow the computer to turn off this device to save power by clicking OK.
Reference! When using a wireless mouse, it takes some time to detect it when the operating system starts, so it may not start working with the mouse right away, which is normal.
How to identify a malfunction?
If the mouse cursor does not move after connecting it, you can try turning the mouse off and on again. You can also try changing the USB port on your laptop into which the receiver (dongle) is inserted.
If this does not help, you need to refer to the “Problems” section of the manual supplied with the mouse to solve any problems that may arise.
If the mouse connects directly to your laptop, you can also try reinstalling the Bluetooth driver on it.
- Go to "Device Manager".
On a note! The correct connection of the RF mouse may also be interfered with by installed antivirus software, which can be disabled while it is running.
Video - How to connect a wireless mouse to a laptop
Did you like the article? Save so you don't lose!
A user can connect a wireless computer mouse to every relatively modern computer or laptop. We will tell you how to connect a wireless mouse via an adapter and Bluetooth, what settings you need to make in the operating system, possible problems, and ways to solve them.
With adapter
This type of mouse is the most popular, so most likely this is the mouse you have. It also connects quite simply to both a laptop and a regular desktop computer without Bluetooth. And connecting a wireless mouse to a laptop occurs in one step.
Find the wireless module under the case and connect it to one of the USB connectors on your laptop or computer. The PC must be turned on.
At the bottom of the mouse, find the switch and move it to the “ON” state. To turn it off, you probably already understood, you need to move it to the “OFF” state. But usually the mouse turns off automatically and there is no need to do this all the time.
The drivers should install automatically, and you will see a connection notification in the lower right corner of the screen in the tray. If the cursor does not move after this, then do the following:
You can also go to Device Manager:
Usually there are no connection problems, and the drivers are automatically available on all versions of Windows: 7, 8, 8.1 and 10. If you have any difficulties, try connecting it to another computer or laptop. Otherwise, you need to take it back to the store.
Instructions for connecting via adapter
The vast majority of wireless computer mice are connected to a laptop or computer via an adapter. The signal is transmitted via the Wi-Fi protocol from the device to the adapter and then processed by the computer. The maximum operating range is usually 15 meters. Next, we will describe in detail how to connect a wireless computer mouse to a laptop. The instructions provided will also be relevant for those who are interested in how to connect a wireless mouse to a personal computer.
Manipulating the mouse and adapter
If you have a wireless mouse, the first thing you need to do is find and connect the adapter. Typically, it comes in a box with the product itself or is hidden inside the mouse body. It is usually located in a special recess or compartment on the back of the mouse.
Connection via Bluetooth
Next, we will tell you how to connect a wireless mouse to a laptop via Bluetooth. To do this, your laptop or computer must have the appropriate module. Most laptops have such modules installed from the factory. To connect a wireless mouse to your computer, follow these steps:
- Go to the Bluetooth section. In the program bar in the lower right corner, right-click on the corresponding icon.
- Select "Add device".
- The system will search for all devices. Among those found, naturally, click on your wireless mouse and click “Next”.
- In the connection type, select the last item labeled “Pairing without code.” Click Next.
- Wait until the device setup is completed.
In Windows 10, users can activate search through the main menu. Click on “Start”, select “Settings” -> “Devices”. Move the Bluetooth enable slider to the active state, and select the required devices in the found devices window.
Connect a wireless radio mouse via a USB adapter
After connecting, Windows should install the drivers. I have already connected many wireless mice, and I have never encountered a problem when Windows cannot find or install the required driver. If it happens that the system does not recognize the device, then you can try downloading the driver or software from the manufacturer’s website. We write in the search the name and model of our mouse. For example, “Logitech M185” and in the search results we go to the official Logitech website. There we already look for the downloads section and download the necessary driver. But you probably won't have to do this.
After this, the mouse should work immediately. If it turns out that after connecting the wireless mouse does not work, then first of all:
In most cases, these devices connect and work without any problems at all. Especially in Windows 10, Windows 8, Windows 7.
Possible problems and solutions
Wireless equipment may not connect for a variety of reasons, from incorrectly installed drivers to defects. We recommend the following setup steps:
- turn the mouse on and off several times and then check again;
- check if the battery is charged;
- Check the functionality of the USB port into which the adapter is installed (try connecting another device to it).
- make sure the bluetooth module is working properly (connect your phone or tablet to your laptop);
- install the driver (be sure to restart your computer after this);
- Make sure that the operation of the wireless adapter or Bluetooth module is not blocked by administrator rights or other software (antivirus).
Some hardware problems can be solved with specialized software, for example, MS Fix IT or Connection Tools. After launch, the program prompts the user to check the system for the absence or presence of malfunctions. The software will scan. If problems are detected, a window will appear asking you to fix them. Before answering positively, carefully read what exactly the program will correct.
Now you know all the troubleshooting methods. Having solved them, you will be able to freely use a wireless mouse. If the described methods do not help, take the mouse to the purchase store and present your claims about its inoperability (if the product is under warranty). Alternative options are to take the device to a service center or simply buy a new mouse.