If you don’t have special equipment (rolling, torque wrenches, vacuum pump and much more) and the skills to work with them, then you’re unlikely to be able to do it yourself for the first time.
No matter how many useful tips and instructions from A to Z you read, you can still miss some subtle detail, or do the work of insufficient quality due to lack of experience.
As a result, after a certain period of time, you will still have to call specialists and redo everything.
What is this article for then? In order to invite an installer or a team of air conditioners, you can independently control the quality of work during the process, and be sure that your air conditioner will work for a long time and without any problems.
Where to drill a hole for a highway
Where does the work begin? First of all, choose a place to install the air conditioner and mark a hole for laying interconnect communications.
Next, you begin drilling a through hole to the street. For this, a drill with a length of at least 800 mm and a diameter of 45 mm is used.
For powerful air conditioners over 2.5 kW, a drill with a diameter of 80 mm may be needed.
To avoid the formation of dust in the room, with an economical option, hang a plastic bag under the drilling site.
Professional installers have been using a construction vacuum cleaner for this task for a long time.
However, when wet drilling solid concrete walls, no amount of protection or vacuum cleaners will save you.
This hole, after all communications have been laid through it, is subsequently foamed.
Mistake #1
Please note that for normal condensate drainage, it is necessary to drill at a slight angle towards the street.
In this case, condensate will be removed unhindered, and water will not accumulate and become moldy in the drainage.
Mistake #2
Some people first attach a mounting plate under the block and then drill.
It is not right. The fact is that when drilling in a pre-designated place, you can accidentally hit the reinforcement.
As a result, the hole will have to be moved. Because of this, the air conditioner itself inside the room will move a few centimeters.
When choosing a place for a through hole and placing the outdoor unit on the side of the window, it is necessary to drill so that the hole ends up almost at the top level of the outdoor unit.
This will create maximum slope for the main pipes and will help prevent oil from entering the evaporator.
Where is the best place to install the outdoor unit of the air conditioner?
When placing the outdoor unit, it is necessary to pay attention to the cost-effectiveness of installation, as well as the convenience of further maintenance of the equipment (cleaning, repairs, etc.). When choosing where to install the external air conditioner unit, pay attention to the following points:
— For the safety of the equipment, it should not be installed close to the ground. If you cannot install the outdoor unit any other way, take measures to prevent hooliganism and theft of the device. For this you can use bars, alarms, surveillance cameras, etc.
— To prevent various objects from falling onto the outdoor unit, you can install protection.
— The outdoor unit must not be installed near heat sources.
— The outdoor unit of the air conditioner must be installed so that the distance to any objects and objects is at least 3 meters.
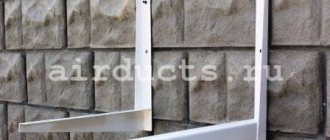
To install the outdoor unit, special brackets and anchor bolts are used to prevent vibration. If you install the external unit of the air conditioner in violation of these requirements, it will be noisy and can quickly fail.
Air conditioner installation location
Align the mounting plate strictly according to the level.
In this case, the distance from the ceiling to the air conditioner itself must be at least 10 cm. This ensures good air intake and free installation and dismantling of the indoor unit.
For reliable fixation, use high-quality dowel nails 6*40mm or 8*32mm.
Next, you can proceed to installing the outdoor unit. Mark the mounting points for the brackets.
Again, don't forget about the level.
Use a hammer drill with a 12mm drill to make holes. Then secure the dowel brackets with 12*80mm nails.
Fasten securely, especially if the condo hangs from the side of the house where the roadway or sidewalks are located.
The distance from the rear wall of the outdoor unit to the wall of the building should be at least 10-20cm. Although much here will depend on the performance of the fan.
Where to place the external unit, under the window or on the side, is a matter of aesthetics and ease of use.
Many simply don’t like the extra meters of dangling cable and tubes hanging down the wall. In this case, a lateral location is selected.
Although competent installers can lay both the cable and the freon pipe very beautifully. Here a lot depends on the level of professionalism of the performers.
An air conditioner under a window is somewhat easier to maintain than one on the side. Especially if after a few years its bolts completely rust. In this case, you can’t do without a tower or climbing equipment at all.
When installing the block on the side of the window, it would be a good idea to be on the safe side. The order here is this.
Raise the air conditioner to the windowsill. Pass a rope through the drilled hole, pull it out from the street and tie it to the block.
Your partner belays the air conditioner with this rope, and you install it on the brackets. It is better not to untie the rope until the bolts are tightened.
Mistake #3
If after installation it turns out that the vibration of the air conditioner is heard as a strong hum in the room (this happens when mounting brackets directly into concrete using anchor bolts without dowel nails with plastic inserts), then special vibration supports or at least thick rubber inserts are placed under the legs of the outdoor unit.
Upon completion of the installation of the external unit, proceed to the preparation and installation of inter-unit communications.
Procedure for installing an air conditioner
The installation work proceeds according to the developed algorithm. All requirements and rules are taken into account. Air conditioner installation procedure:
- Electrical wiring is laid to connect the system to the network.
- Installation of the unit outside the room.
- choosing the optimal location for installation, which will be located above 2 m from the ground level;
- fixing the brackets to the selected anchor bolts;
- installation of the block in a prepared place (brackets);
- creation of main holes in the wall, the diameter of which is from 50 to 60 mm for all communications;
- installation of a waterproofing cylinder in holes and connecting communications.
- Installation of the unit indoors:
- choosing the optimal location according to the requirements described above;
- installation of brackets for air conditioning;
- installation of the indoor unit in its place.
- Wiring connection:
- installation of internal or external boxes;
- joining copper pipes through which freon will circulate, connecting electrical wires;
- vacuumization - air and all moisture are removed from the system. Special equipment will allow you to perform the operation in about 45 minutes, no less.
- Trial check of the functionality of the installed air conditioner. For this purpose, special software and hardware equipment is used.
The air conditioner is installed and ready to use.
Installation of freon main
For a standard air conditioner with a power of up to 2.5 kW you will need the following materials:
- copper freon pipe with a diameter of 1/4 and 3/8 inches
- heat insulator, also known as insulation (K-Flex) with a thickness of 6 mm and above
- interconnect electrical cable
- drainage hose d-16mm
- reinforced tape or vinyl tape
Measure the required length of the freon line, leaving a reserve that will go to the ring behind the outdoor unit.
Mistake #4
With the total length of the route up to 2m, measure about 1m for the reserve and the ring. This loop plays the role of hydraulic compensation and is necessary on short routes.
With large lengths, the hydraulic loop creates additional resistance to freon and only interferes with the operation of the air conditioner! Although some still do it, supposedly to reduce noise.
Flaring of copper tubes
We move on to the stage of preparing the tubes.
Mistake #5
They can only be cut using a special pipe cutter, no hacksaws or grinders!
When making a cut, it is necessary to hold the end of the copper pipe strictly downward in order to prevent any chips from getting inside.
The ends are processed with a rimmer.
Use the rimmer carefully to avoid scratching the skirt. The quality of rolling is one of the most important aspects in installing an air conditioner.
Mistake #6
Flaring is carried out using a special tool with an eccentric. Don't forget to put the connecting nut on the tube before this step!
The width of the flare should be such that the connection eventually fits freely and unhindered into the nut.
The height of installation of the tube in the rolling clamp is strictly regulated.
The simplest and most proven old-fashioned way to determine the quality of rolling, at least at the initial stage, is to see your reflection in the “skirt”.
Flaring of the pipes of the outdoor unit will have to be done outdoors on weight. Otherwise, the line simply will not fit through the hole.
Mistake #7
Please note - if the installation does not take place on a hot, warm day, then when bringing copper pipes home from the street, close their ends and be sure to wait time for the copper to reach room temperature.
If you bring them in cold and open, then due to the dew point effect, condensation will form inside the tube, which, on a poorly evacuated air conditioner, can lead to dire consequences.
Connecting freon pipes
We move on to the stage of connecting communications.
Connect the flared tubes to the indoor unit of the air conditioner using adjustable wrenches.
If you have a torque wrench, it is better to use it.
Here are the recommended tightening torques for freon tubes of various diameters:
- 1/4 – 16-20Nm
- 3/8 – 35-45Nm
- 1/2 – 45-55Nm
Next, take the interconnect cable and twist it all into a single unit with the freon line using reinforced tape or vinyl tape.
Do not forget to stretch the insulation of the required diameter onto the copper tubes.
To prevent dirt from accidentally getting inside the tube, wrap its ends with electrical tape.
Mistake #8
Under no circumstances should the thermal insulation of the tubes be left unprotected.
Otherwise, from the street under the influence of UV rays, within several seasons it all turns into dust.
If your thermoflex is lightfast and not afraid of the sun, then think about the birds. Crows peck very well and take away such material for their nests.
Mistake #9
Also, do not leave any area indoors without insulation. Especially the junction points.
Condensation will gradually form here and eventually a neat trickle of water will appear on your wallpaper.
The line itself, wrapped with tape, is hidden inside the room in a plastic box.
However, if you have a short area and there are old wallpapers left, then instead of using a box, the highway can be covered with them. The result will be an almost invisible picture.
Next, pass the line through the through hole to the outside.
Determining the place
Self-installation of an air conditioner starts with choosing a location for installation. Since most split systems are formed from at least two components, you will need sufficient space for their installation. You also need to take into account the direction of air flow, and comply with the manufacturer's requirements.
Technical requirements
The first thing you need to pay attention to is the requirements that the manufacturer sets for installing the indoor unit of the air conditioner. By following the rules for installing an air conditioner, you can install it with the highest quality possible and ensure optimal operation of the equipment.
The basic requirements include the minimum permissible distance between system components and obstacles:
- 15 centimeters to the ceiling;
- 30 centimeters to the side walls;
- 150 centimeters to the obstacle to which the cooled air flow will be directed.
The distances indicated are average distances and it is necessary to read the technical documentation supplied with the equipment. For example, some manufacturers require up to 30 centimeters to be left between the ceiling and the air conditioner.
Installation options
Installation of an external air conditioner unit, in the classic version, near a window or on an open balcony. In the case of glazing the balcony, installation of a window air conditioner is possible on the railing, provided that it is sufficiently reliable. Air conditioners are also attached directly to the walls, not far from the windows. Up to the second floor, the blocks are mounted at the maximum accessible height.
Air conditioner installed on the balcony Source evrosib-sever.ru
When deciding how to install an air conditioner yourself in a private house, they proceed from the capabilities of the walls. If the house is sheathed with a ventilated facade, special fasteners are used. If you have a reliable base, the blocks can be mounted on it.
As for split systems, when determining the installation location, you must remember the permissible distances between the units. These parameters are indicated in the technical documentation. It happens that the manufacturer does not regulate the minimum distance, which makes installation easier. In this case, you can place blocks on top of each other using the “sandwich” method.
It is somewhat simpler with the distance between blocks with a maximum length; as a rule, it is within 6 meters. The system can be extended, but this will require refilling with freon.
Drainage
Please note that the drainage hose must be located below the freon line.
Attach the indoor unit to the mounting plate.
Connect the air conditioner drain hoses.
For extensions, many use a regular metal-plastic pipe d-16mm. The factory drain tube is flared and metal-plastic is inserted into it, sealing the connection at the top with electrical tape.
However, over time, a fungus may form inside the metal-plastic material, which will not allow the water to drain away quickly enough.
Therefore, other installers use only corrugated pipes as drainage.
In addition, it is the corrugated drainage that allows you to connect directly to the bath without additional connections.
Connecting the air conditioner to the mains
To finish with the indoor unit, let's move on to connecting the power wires.
Having opened the front cover of the indoor unit, unscrew the plastic plug to connect the cable.
Having inserted the cable, connect it according to the electrical diagram. To do this, look for the following markings on the terminal block:
- L-phase
- N – zero
- grounding icon
Check on the power cable where you have phase and zero and connect the corresponding ends to your terminals.
When connecting a low-power air conditioner (up to 2.5 kW) directly from the switchboard without an outlet, you must have a three-core cable VVGng-Ls 3 * 2.5 mm2 in the groove.
A 16A circuit breaker is installed in the panel.
With a low-power condenser up to 1 kW, you can, of course, use a section of 1.5 mm2 + a 10A automatic, but 2.5 mm2 is a more universal option and will allow you to easily change the split system with a higher power in the future.
If the air conditioner will be connected through an existing socket, then use a wire with a 3*2.5mm2 PVA plug.
There is also nothing complicated about connecting the indoor and outdoor units. Here, as a rule, a 4*2.5mm2 or 5*2.5mm2 cable is used. The terminal markings on these blocks are the same.
Accordingly, throw a cable between them (not the PVS wire, but the VVGng cable!) and connect the wires of the same color to terminals L1 on the internal unit and L1 on the external one, N on the internal one and N on the external one, etc. Just follow the connection diagram and labels.
Sometimes the air conditioner itself in the room is powered not from the outlet, but from the outdoor unit (most often with inverter models). In this case, the exterior will have several more terminals.
This is phase-zero-ground. Then you lay the power cable from the outlet or diffavtomat in the switchboard outside, and not to the indoor unit.
Connecting the freon route pipes from the outside is similar to the room connection.
Installation of one large air conditioner in the hallway
The option of installing an air conditioner in the hallway also has the right to life! The main advantage of this installation is that it eliminates the impact of direct cold flow on people. But the BIG downside is that it will be difficult to get the "correct" temperature in individual rooms (accurate temperature is very important for health). Each case of such installation must be considered separately. But please note that:
The price of one large split is comparable to the price of several less powerful devices;- The cost of installing a large “conder” is no less than the cost of installing several small units;
- High-power air conditioning units are larger, heavier and louder. When positioning and securing them, all this must be taken into account;
- The failure of the only air conditioner in the hallway will lead to a lack of climate in the entire apartment. Parts and repairs will likely cost more;
- Installing an air conditioner in a corridor is the most difficult and responsible operation. It is necessary to take into account all the nuances:
- choose the correct power of the device;
- take care of the reliable removal of condensate (discharge of drainage into the sewer has its own characteristics);
- supply power for a powerful air conditioner from the switchboard (power supply options from sockets are no longer suitable);
- take into account the dimensions and weight of the blocks during installation;
- take into account the amount of refrigerant for the entire “route”.
Basic rules when choosing a location for the air conditioner
In living rooms there are places where a person spends most of the time. Let's call them “rest zones” of a person. These include primarily:
sleeping places in the room;- sofas and armchairs in front of the TV;
- computer workstation;
- dinner table;
- “working” area in the kitchen in front of the unit;
- I will highlight a children's bed as a separate item.
We understand perfectly well that in most apartments it is difficult to find a place where the “conder” will not affect a person’s “rest zone”. But in any layout there is the most “harmless” position of the device.
There is one myth - some people imagine that the cold is concentrated at the location of the air conditioner (they say that it will only be cool in front of the unit or in the place where it “blows”). That's bullshit! If the doors and windows of the room are closed, the temperature will be distributed evenly throughout the room! No matter where in the room there is an internal split unit. Only if the doors are open can you feel that the air-conditioned room is cooler than the hallway.
All air conditioners have the ability to adjust the direction of air flow. But you must understand that air is primarily a gas! It will not “fly” like a stone to where you directed it (where you turned the blinds). In any case, the flow of cold air will “dissipate” throughout the room. OF COURSE, the movement of cold air will be felt stronger directly opposite the block.
If you need coolness to also flow into the corridor, then there is no need to place the block opposite the door. When the door is open, the coolness will “come out” of the room in any case. The location of the air conditioner strictly opposite the door can “play” only to a small extent (the entire air flow will not fly like a solid object in one direction).
Air conditioner vacuumization
But for the next stage of work you will need a vacuum pump. It is necessary for vacuum drying of the freon line.
Mistake #10
You can never guarantee that all the moisture will be driven out simply by the freon itself. The air contains this moisture. Without normal vacuumization, sooner or later your compressor will fail.
If you do not bleed the air, the pressure in the system will be affected (it will rise). In this case, the compressor’s performance may drop by about 30-35%, and it will operate under constant load.
And the moisture contained in the air affects the rapid decomposition of oil and an increase in its acidity level.
This further leads to two consequences:
- destruction of the varnish insulation of the windings on the electric motor by the acidic environment and its failure
- gradual “washing out” of copper from the tubes and its entry onto the working surface of the compressor with a decrease in gaps
Therefore, if the invited “specialist” came without a vacuum pump, then know that very soon you will see him again. And you will meet him very often.
The operating time of the vacuum pump depends on the length of the line. The minimum length is 2m. If you get less, then sooner or later the oil from the compressor will definitely get into the evaporator and your air conditioner will not work for a long time.
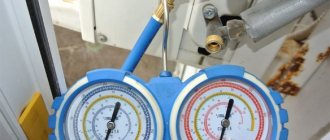
For a standard short section, vacuumization time is from 15 to 20 minutes. It is counted after the direct creation of a vacuum (reaching a pressure of 5 torr). This can be checked on the pressure gauge manifold, or heard by the changed sound of the pump.
When the sound almost disappears, start counting the time from that moment.
Installation tips. Where is the best place to install an air conditioner?
Before you buy a split system in Krasnodar, it is advisable to determine the place where you will hang it.
It is technically possible to install an air conditioner in a room absolutely anywhere, however, for its high-quality operation, without the risk of failure, there are certain rules and some nuances that must be observed during installation.
In this article, we will try to describe in as much detail as possible the most common mistakes during the installation process, as well as give recommendations for the correct installation of the air conditioner in order to avoid unforeseen problems in the future.
Recommendations for installing the indoor unit:
1. Install the indoor unit of the split system at a distance of at least 10 cm from the ceiling. Since the air conditioner takes air for cooling/heating from the room (not from the street), a small distance from the ceiling to its upper part (where the air intake grille is located) can make recirculation difficult air. In this case, firstly, the air conditioner will not be able to produce a sufficient amount of cold/heat, and secondly, it will wear out, which will lead to rapid failure of its compressor. That is why it is forbidden to place various objects on the air conditioner and cover its upper part. If you are installing an air conditioner at the renovation stage, take into account the possible lowering of the ceiling level (stretch ceilings, plaster ceilings, etc.).
2. Do not mount the indoor unit of the split system above cabinets, shelves, or chests of drawers if the distance from them to the lower edge of the indoor unit is less than 70-100 cm. Firstly, this leads to the dust accumulated on the upper surface of the cabinet being blown away every time the air conditioner is turned on. Moreover, close proximity of horizontal surfaces leads to the creation of an air flow circulation, which leads to a decrease in the efficiency of the air conditioning system. The flow from the air conditioner is carried back into the air intake, the air exchange in the room deteriorates, the air conditioner, taking in cold air, begins to “think” that it is time to stop working, because the temperature sensor is located at the inlet of the flow.
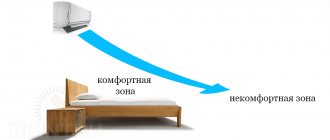
3. The air flow should not be directed directly at people. When operating in cold conditions, the temperature of the air stream from the air conditioner is 7-15°C lower than the ambient air temperature in the room. If such a stream blows on a person for at least several tens of minutes, poor health is guaranteed subsequently. Typically, air is directed so that it passes between work areas or where people are least likely to be. In the bedroom, you often have to make a choice on which wall in relation to the bed to hang the air conditioner. Most often, people are afraid to place the indoor unit above their head and mount the unit on the wall towards which their feet are facing. If it is not possible to remove the unit as far as possible from the bed and direct the air in the other direction, it is better to mount it above your head. In this case, cold air will not blow on the head, but on the legs, which are usually covered with a blanket.
4. Do not install the indoor unit of the air conditioner above a heat source (for example, above a radiator). Due to the flow of warm air rising upward from the heat source, the air conditioner will think that it is not cooling the room enough and will work for wear, as a result of which it will quickly fail. In addition, excessive heat may cause the plastic casing of the indoor unit to become deformed.
5. Do not install the air conditioner where air circulation will be difficult (for example, behind curtains, etc.). The distance to the obstacle should not be less than 3 meters. The cooled (or heated) air flow from the air conditioner will be reflected from the obstacle and will return back at the same temperature with which it “came out”. The air conditioner will decide that the work has been done, the desired climate has been set and will turn off.
6. The indoor unit of the split system must be installed strictly at level. This is necessary so that the moisture condensed on the heat exchanger can be easily removed outside through the drainage system. If the indoor unit is installed with a significant distortion (±3-4 mm is allowed), there is a possibility that water will accumulate in the drain pan and periodically flow out of it directly onto your floor.
7. It is not recommended to install an air conditioner in rooms where devices with high-frequency electromagnetic oscillations (for example, a drill, a drilling machine) are constantly operating. High-frequency vibrations can knock down the chip (processor) installed inside the air conditioner.
8. Try to install the indoor unit so that the length of the freon pipe is minimal. Firstly, a long route increases the cost of installation, and secondly, it reduces work efficiency. Moreover, if you decide to lay the route in a box, then a long box across the entire wall will greatly spoil the interior.
9. If possible, connect a separate power cable to the air conditioner. For any air conditioner, even a low-power one, it is necessary to install separate electrical wiring and install a separate circuit breaker in the electrical panel. Because old wiring may not withstand the load and it will catch fire. Be especially vigilant if your home is older than 1990. In older houses, the wiring is not designed to withstand the loads caused by the use of powerful electrical equipment.
Recommendations for installing the outdoor unit:
1. Do not install the outdoor unit on a glazed balcony or loggia, as heat removal will be very difficult. Installation is only possible if the windows can be opened wide. In this case, it is necessary to pay attention to the operating temperature range of the outside air. The upper temperature limit for different air conditioners is not the same and ranges from 40 to 46 C.
2. The outdoor unit should not cause inconvenience to your neighbors (noise, draining condensation).
3. Try to place the outdoor unit in such a way that the sun's rays fall on it as little as possible. Direct rays of the sun can trigger a protective shutdown of the device due to overheating.
4. Position the outdoor unit in such a way that during operation, the heat removed from the room is freely discharged into the environment (for example, do not install the outdoor unit where the prevailing wind is directed towards the air conditioner, as the normal operation of the fan will be disrupted).
5. Do not place the outdoor unit in close proximity to trees. Foliage and fluff from poplars clog the heat exchanger, and during gusts of wind, branches can get into the equipment and damage the fan or heat exchanger fins. If, after all, your house is completely surrounded by greenery, then you need to cut down some of the branches located next to the air conditioner.
6. It is prohibited to install outdoor units on the ground or in places where they may be dirty with dirt, covered with snow, or flooded with rain or sewage water. The blocks must be installed on a special stand.
7. It is prohibited to install outdoor units in places where there is a possibility of leakage of explosive gases. In particular, this applies to the air conditioning of the first and second floors, where the gas pipes of gasified buildings usually pass.
8. When placing the external unit on the ground floor, install it in a special protective grille. This will prevent theft and acts of vandalism.
9. Take care of condensate drainage. Most often, condensate is discharged to the street. In this case, the flowing water should not fall on the wall of the building. Discharging condensate into the sewer system is preferable, but expensive. If you plan to install the block above the sidewalk, then this is the only acceptable option.
10. Do not install the outdoor unit on a weak foundation such as a wall made of hollow bricks or thin metal. The fragility of the supporting structure almost always causes excess noise, which takes a lot of effort and money to eliminate. And the air conditioner may simply fall.
If you need high-quality installation (installation) of split systems in Krasnodar, specialists from SPLIT-LINE.RU will help you with this.